

Fabric Edging on Hand Knits
A useful technique is using a sewing machine to line the edges of hand knits with fabric bias tape. This is a good way to keep knit edges from curling up, and to strengthen and stabilize an edge that has to support button holes or other load-bearing features. It can also be very decorative if you find a complementing fabric.
The following example is from the Elora Lace-Up sweater.
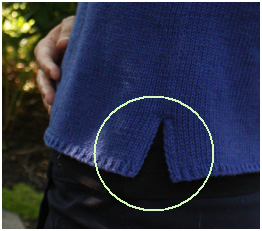
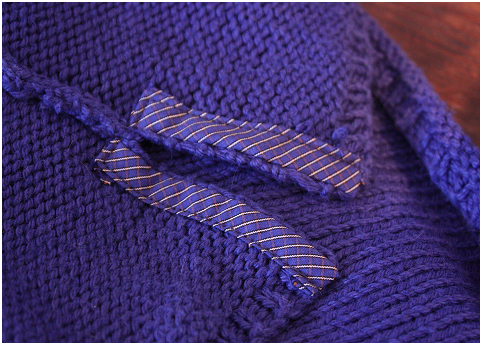 The photo above is the reverse side of the side-placket encircled below. The photos in the instructions that follow were taken while lining the front placket, also encircled below.


Instructions:
Cut 2 pieces of fabric on the bias (45 degrees, to the fabric selvedge edge.)
- Width = 1.5”
- Length = Length of the edge being lined + 1”.
See the following link, if you would like more information about making bias tape:
https://blog.seamwork.com/fabric-haberdashery/tutorial-how-to-make-bias-tape/
For each strip, fold over one of the long sides by 1/4” and press it. Then turn down one of the ends.

Press the curled edge that you intend to line with the fabric.

Pin one fabric piece to each edge as shown below. (Right side and wrong side of same edge, shown below.) Fold down, and pin under, any excess length.

Take the second piece of fabric, and fold down the unfolded end so that it matches the first, pinned piece, in length.

Pin the second piece, to the other edge:

Install a walking foot on your sewing machine so that you can sew with the knit fabric on top without stretching it. Sew along the border between the garter selvedge stitch and the stockinette area.


This is what it should look like when you’re done:

Fold back the bias tape as shown below, and pin it down:

With the fabric side up, sew down the bias tape, along the folded edge, close to the edge:


Stop at the corners, raise the presser foot, turn your work, and sew straight across both pieces of fabric where they come together at the base of the bust, as shown below. Back stitch a few times across this line for extra strength.


And you are done! Turn it right side out and enjoy your work:)